
THE FASCINATING WORLD OF NETWORKING
OPTIMIZED FOR GOOGLE CHROME
DOT1X using Cisco ACS 5.3 as the Authentication Server
Date: 2-5-2014
Table of Contents
-
Topology for dot1x with ACS.
Topology

-
ACS 5.3 (Authentication Server) – Virtual machine running on VMWare Workstation 10 and linked to GNS3 using a virtual interface connected to a Cloud.
-
HOST (Supplicant) – Qemu host using linux-microcore-2.11.5.img with wpa_supplicant extension.
-
AUTHENTICATOR – Etherswitch with c3725-adventerprisek9-mz.124-15.T5.bin
-
INTERNET – It’s a Cloud linked to my real network card.
Configuration Scenario
The configuration scenario will be to configure the Cisco Secure ACS server using basic 802.1X. The client will either be using an 802.1X supplicant (HOST) or will be a guest without a supplicant (NO_DOT1X). Additionally, the client will connect to a LAN switch that requires authentication on its user ports and will use usernames and passwords to authenticate to the AAA server using EAP-MD5. The router (AUTHENTICATOR) is running the Cisco IOS Software and is configured with 192.168.220.10 as its management IP address.
The AAA server is Cisco Secure ACS 5.3 with an IP address of 192.168.220.50 and is configured with RADIUS for 802.1X communications.
NOTE I will configure ACS 5.3 for device administration (different users will be able to manage the Authenticator with different privilege levels) and for port authentication, using DOT1X.
Configuration of Authenticator
NOTE On the ports that will require 802.1X authentication, ensure that the interface is configured as a Layer 2 access port with the switchport mode access interface command. Make sure that the user interfaces are assigned to a proper access VLAN.
hostname AUTHENTICATOR
!
enable secret 5 $1$.IRU$hKCsJyGP1T/BgA87nlpNO.
!
aaa new-model
aaa authentication login default group radius local
aaa authentication dot1x default group radius local
aaa authorization console
aaa authorization exec default group radius
aaa accounting exec default start-stop group radius
aaa accounting system default start-stop group radius
!
ip dhcp excluded-address 192.168.2.1 192.168.2.10
!
ip dhcp pool JUANTRON
network 192.168.2.0 255.255.255.0
default-router 192.168.2.10
!
dot1x system-auth-control
!
username juantron privilege 15 secret 5 $1$8SNu$ZrJe0MK6h5xsZWRMDnI5Z1
!
interface FastEthernet0/0
ip address 192.168.220.10 255.255.255.0
!
interface FastEthernet0/1
ip address 192.168.1.200 255.255.255.0
!
interface FastEthernet1/2
switchport mode access
spanning-tree portfast
!
interface FastEthernet1/3
switchport mode access
dot1x port-control auto
spanning-tree portfast
!
interface Vlan1
ip address 192.168.2.10 255.255.255.0
!
radius-server host 192.168.220.50 auth-port 1645 acct-port 1646 key juanma
Configuration of Cisco Secure ACS 5.3
Task 1. Configure a Radius Server.
Cisco Secure Access Control Server (ACS) 5.3 for Windows provides a centralized identity networking solution and simplified user management experience across all Cisco devices and security management applications.
Add a router/switch as a AAA client.
To add a router/switch as a AAA client, navigate to the Network Resources option on the menu on the left and click the Network Device and AAA Clients. Select Create:

Here, you specify the hostname of the client, the IP address, the authentication protocol (Radius or Tacacs+) and the shared secret.Task 2: Populate the User Authentication Database.
Task 2: Populate the User Authentication Database
Let’s create two user groups:

NOTE Machine based authentication is when you want to use the computer machine user account that’s part of The AD domain of your organization to replace the user authentication.
In this case we will define different users for authenticating every machine connected to the authenticator, so local users have to be defined on Cisco ACS:
Users and Identity Stores > Internal Identity Stores > Users; Select Create:

These users also could be able to be used for device administration. So, let’s create two Authorization Profiles:
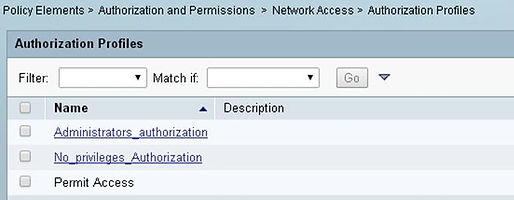
For Administrators_authorization:

Note: Dictionary Type = RADIUS-Cisco
For No_privileges_Authorization:

Cisco avpair is used for cisco devices only. For other 3rd party devices, separate attribute is required to be pushed by radius server.
The users authenticated with RADIUS will default to privilege level 1. If you want to assign the privilege level via RADIUS you need to enable aaa authorization exec default group radius and then use the Cisco A/V pair to assign the privilege.
You need to use Cisco AV pairs with the argument "shell:priv-lvl=X" where X is the privilege level that should be assigned to the user. For example: shell:priv-lvl=15
This example immediately grants access to a user of a device-hosted administrative session to EXEC commands.
Task 3. Configure the Access Policies
You can not use the device administration policy for Radius in ACS 5.3
For ‘Administration of device via radius’ you need to use Network Access service.
The steps are:
Step 1. Modify the Default Network Access.
Step 2. Create a new Access Policy: “No_privileges_Access”
Step 1. Modify the Default Network Access.
Access Policies > Access Services > Default Network Access > Edit: "Default Network Access"
Click Allowed Protocols:

Access Policies > Access Services > Default Network Access > Identity

In this case I have selected “Internal Users” stores, It can be changed to AD or other available external Database.
Access Policies > Access Services > Default Network Access > Authorization

Step 2. Create a new Access Policy.
Select “Default Network Access” in Access Services and Click on duplicate:
Change the name and click on Submit.
Access Policies > Access Services > Default Network Access > Identity

Access Policies > Access Services > Default Network Access > Authorization

Task 4. Configure Service Selection Rules
Delete the default rules and create a new rule called RADIUS.
When no enabled rule matches select No_privileges_Access.
Go to Access Policies-->Access Services-->Service Selection Rules.

Configuring the Supplicant
Step 1. Start Microcore Linux on GNS3.
Step 2. Configure the interface.
HOST needs Internet connection to run 802.1x-compliant system software.
sudo su
Configure eth1:
# ifconfig eth1 192.168.1.200 netmask 255.255.255.0 up
Configure the default gateway for Internet access (192.168.1.1 is the IP of my router):
# route add default gw 192.168.1.1 dev eth1
We can test the Internet connection with: ping 8.8.8.8
Step 3. Install wpa_supplicant extension to Microcore.
We need Internet connection do download the wpa_supplicant.tcz file from the Internet (distro.ibiblio.org). Run the following command (Don’t run this as root):
$ tce-load -iw wpa_supplicant.tcz
Step 4. Dot1x Client configuration.
Wpa_supplicant.conf doesn’t exist so we must create it.
sudo su
vi /etc/wpa_supplicant.conf
NOTE Use vi editor to add the following commands:
ctrl_interface=/var/run/wpa_supplicant
ap_scan=0
network={
key_mgmt=IEEE8021X
eap=MD5
identity=”juanma”
password=”juanma”
eapol_flags=0
}
This configuration works for EAP-MD5 authentication. Before the switch allows dot1x client access to the network client needs to be authenticated with username juanma and password juanma on Radius.
Step 5. Start wpa_supplicant for wired ethernet eth0.
# wpa_supplicant -ieth0 -Dwired -c /etc/wpa_supplicant.conf

Ctrl +C to abort.
As you can see, the machine connected to fa1/3 port is authorized by the ACS Server.
Run DHCP activation: # udhcpc
Test the connection to authenticator.
ping 192.168.2.10 …..OK
ping 192.168.220.10.. OK
Finally, you can manage AUTHENTICATOR from this machine:

Testing the users using ACS 5.3
To test the users, first you have to test the users from the PC or the switch.
AUTHENTICATOR# test aaa group radius username password legacy
To verify the operational status of the 802.1X configuration on your device:
AUTHENTICATOR# show dot1x all
To see the authorization state of each of the interfaces on which you have 802.1X authentication configured:
AUTHENTICATOR# show dot1x all summary
From Cisco Secure ACS, select “Monitoring and Reports” and click on AAA Protocol and run RADIUS_Authentication for last 30 minutes:


Other Dot1X Authentication Examples:
NOTE: Your e-mail will not be shown in the output. You can use an invalid e-mail, if you want.