
THE FASCINATING WORLD OF NETWORKING
OPTIMIZED FOR GOOGLE CHROME
CISCO SECURE ACS ON VMWARE
Table Of Contents
-
Introduction
Introduction
I want to share this information with you, because I think there is a lack of information about this.
To begin, the preconditions to install ACS are:
-
VMWare Workstation or Server.
-
An ACS image (you need a Cisco CCO account to download this).
In my case:
-
VMWare version: VMware-workstation-full-10.0.1-1379776
-
ACS image: ACS_v5.3.0.40.iso
-
Operating System: Windows XP, SP3 (4 GB RAM).
Installing an ACS Virtual Machine on VMWare
File/New Virtual Machine:
Date: 7-3-2014

-
Select: Workstation 6.5-7.x
-
Click “I will install the operating system later”.
-
Select a Guest Operating System: Linux, Versión: CentOS
-
Name the Virtual Machine: xxxx (Locatión: default).
-
Procesor Configuration: Number of processors: 2; Number of cores per processor: 1
-
Memory for the Virtual Machine: 1024 (Recommended memory).
-
Network Type: Use bridged networking (to be changed later)
-
Select I/O Controller Types: LSI Logic
-
Select a Disk Type: SCSI
-
Select a Disk: Create a new virtual disk
-
Specify Disk Capacity: 60 GB for Maximum disk size; Split virtual disk into multiple files
NOTE Be aware on TACACS+ min requirements: 60GB=EVAL Version, 512GB=FullVersion. It won’t get installed if your virtual machine size is lower than 60GB. Disk space min. 60GB, the release checks the Hard-Disk for available space first before installation.
-
Specify Disk File: leave in the default.
-
Ready to Create Virtual Machine: Select Customize Hardware …
-
Hardware: Select New CD/DVD and click Use ISO image file. Browse and select the IOS image. Close and Finish.
-
Select the virtual machine you have created and Click Power on this virtual machine.

Choose option 1.
Once setup is completed, it will prompt for login at which point you just need to type setup to configure login and other network settings. Just type “setup”, you don’t need to provide any logins.

Then it will allow you to configure hostname, IP, DNS, password and so on.

I have configured for my ACS Server the following IP address: 192.168.220.50/24 and default-gateway 192.168.220.1
Once you have configured the settings, it will start installing ACS applications and will reload.
Run “show application status acs” to check all acs processes are running correctly.

Click I finished Intalling
But, have you finished the ACS intallation?. Let’s see:

Obviously, the answer is no.
You need web access to the Cisco ACS to continue.
NOTE If you change the IP address, you have to reload the system (saving changes).
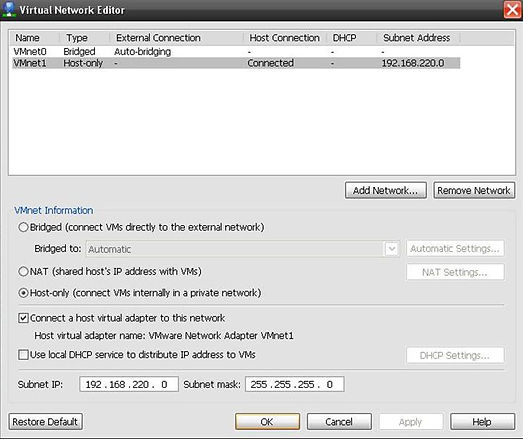
Configuring network connections
NOTE This was the most difficult task for me, because there is no mention on the Internet of how to connect to this virtual machine from your PC or laptop. At least, I didn’t find it or it’s ambiguous.
You have to create two network adapters: VMnet0 and VMnet1.
Go to: Inicio/Todos los programas/VMWare/Virtual Network Editor; Add Network.
For VMnet0:

For VMnet1:
A new network connection is created on Windows:

NOTE: You can use this virtual interface to link to GNS3.
Now, see Virtual Machine Settings/Hardware/Network Adapter.
For VMnet0:

For VMnet1:

Web Access to ACS
Run VMWARE player (faster than VMWare Workstation) and launch the virtual machine.
Open a windows console to test if the ACS Server is up:
ping 192.168.220.50
When responses have been received from this IP address, you can open a web navigator:

The default username and password to access the ACS web interface are:
Username: ACSAdmin
Password: default
The first time you log in to the web interface, you will be prompted to change the default password. Cisco recommends that you do so for security reasons. You can change your password for the first time only by logging into the web interface. You will also be prompted to install the license.
Note You cannot delete the default acsadmin user. You can, however, create other users with admin privileges from the web interface.
Up to six users can access the ACS Configuration mode at a time; six users equal six sessions. When one of the six sessions ends, you must wait up to five minutes for the session to be available to another user.

Installing the license

Click Seleccionar archivo and browse the license you have download from Cisco (period of validity 90 days).
You don’t need a CCO account for this download, but you need a Cisco ID.
Finally:

Now you can learn to configure ACS as a Radius Server, Tacacs+ Server, and so on.
After resetting your password and installing a valid license, use the default username (acsadmin) and changed password, or the username and password for a newly created admin user.
Checking configuration using CLI
Verify your network connections:
sh interface

eth0 = gigabitethernet 0

To change the IP address, enter to configuration mode:
juantron/juantron#configure terminal
From this level, you can enter commands directly into the ACS configuration. To obtain a list of commands in this mode, enter a question mark (?).
juantron/juantron(config-acs)# ?
For example:

You can enter exit or press Ctrl-d to leave the ACS configuration mode and return to the EXEC mode.
To add a default gateway:
juantron/juantron(config-acs)#ip default-gateway 192.168.220.1
To verify the default gateway:
juantron/juantron#show ip route
Finally, you can access to ACS configuration mode:
juantron/juantron#config-acs

NOTE: remember the password you configured for web access. The letters are not case-sensitive.
You must have privileges to enter the ACS Configuration mode, and must supply the username and the password that you use to log in to the ACS web interface.
Troubleshooting ACS
Problem: "ACS runtime process is not running on this instance at this time."
Users cannot login to the ACS GUI and this error message is received:
"The ACS runtime process is not running on this instance at this time. Changes can be made to the ACS configuration (these will be saved in the database), but changes will not take effect until the runtime process is restarted."
Solution:
Manually restarting the runtime process from the CLI and rebooting the appliance resolves this issue. This is a minor issue and does not create any performance issue for the ACS.
First of all, you have to verify that all the acs processes are running:
show application status acs
In order to restart the runtime processes manually, issue these commands from the ACS CLI:
acs stop runtime
acs start runtime
Wait 1 minute. Then:
acs stop management
acs start managemet
GNS3 Examples
See:
Your e-mail will not be published.
You can use an invalid e-mail.