
THE FASCINATING WORLD OF NETWORKING
OPTIMIZED FOR GOOGLE CHROME
Botnet Traffic Filtering
Date: 14-4-2015
Table of Contents
-
Introduction.
Introduction
Malware is malicious software that is installed on an unknowing host. Malware that attempts network activity such as sending private data (passwords, credit card numbers, key strokes, or proprietary data) can be detected by the Botnet Traffic Filter when the malware starts a connection to a known bad IP address.
Botnet Filtering is used to detect botnet activities. You can configure the Botnet Traffic Filter to log suspicious activity. Optionally, it can be also configured to block communication (suspicious traffic) automatically.
Before Botnet Filter can inspect traffic, reverse DNS entries must be derived.
Two databases are maintained when this feature is enabled:
1. Dynamic Database (SensorBase) – downloaded from Cisco (make sure to configure DNS server).
2. Static Database – “whitelist” (good IPs/domains) & “blacklist” (bad IPs/domains).
• Dynamic Database uses DNS Snooping in most cases (DNS Inspection is a prerequisite).
• Static Database uses ASA’s DNS Resolver (can also “fallback” to DNS Snooping).
The Botnet Traffic Filter checks incoming and outgoing connections against a dynamic database of known bad domain names and IP addresses (the blacklist), and then logs or blocks any suspicious activity.
The Botnet Traffic Filter can receive periodic updates for the dynamic database from the Cisco update server. This database lists thousands of known bad domain names and IP addresses.
The ASA uses the dynamic database as follows:
1. When the domain name in a DNS reply matches a name in the dynamic database, the Botnet Traffic Filter adds the name and IP address to the DNS reverse lookup cache.
2. When the infected host starts a connection to the IP address of the malware site, then the ASA sends a syslog message informing you of the suspicious activity and optionally drops the traffic if you configured the ASA to do so.
3. In some cases, the IP address itself is supplied in the dynamic database, and the Botnet Traffic Filter logs or drops any traffic to that IP address without having to inspect DNS requests.

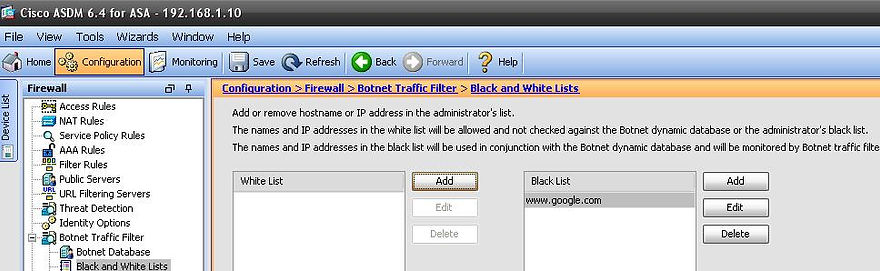
You can also supplement the Cisco dynamic database with blacklisted addresses of your choosing by adding them to a static blacklist; if the dynamic database includes blacklisted addresses that you think should not be blacklisted, you can manually enter them into a static whitelist. Whitelisted addresses still generate syslog messages, but because you are only targeting blacklist syslog messages, they are informational.
Note If you do not want to use the Cisco dynamic database at all, because of internal requirements, you can use the static blacklist alone if you can identify all the malware sites that you want to target.
Addresses monitored by the Botnet Traffic Filter include:
•Known malware addresses—These addresses are on the blacklist identified by the dynamic database and the static blacklist.
•Known allowed addresses—These addresses are on the whitelist. The whitelist is useful when an address is blacklisted by the dynamic database and also identified by the static whitelist.
•Ambiguous addresses—These addresses are associated with multiple domain names, but not all of these domain names are on the blacklist. These addresses are on the greylist.
•Unlisted addresses—These addresses are unknown, and not included on any list.
Unlisted addresses do not generate any syslog messages, but addresses on the blacklist, whitelist, and greylist generate syslog messages differentiated by type.
Botnet Filtering Configuration
Prerequisites:
•The ASA must be running minimum 8.2 code to be able to configure botnet feature.
•Enable ASA use of a DNS server
•Botnet license must be installed on the ASA
1. Enable DNS client on ASA
This is necessary to resolve the address of Cisco updater service (CSIO's updater service) to fetch updates. Example:
ASA(config)#dns domain-lookup outside
ASA(config)#dns server-group DefaultDNS
ASA(config-dns-server-group)#name-server 4.2.2.2
2. Enable dynamic traffic filtering (download the Dynamic Database):
hostname(config)# dynamic-filter updater-client enable
If you do not have a database already installed on the ASA, it downloads the database after approximately 2 minutes.
3. Enable the Botnet Traffic Filter database update (Activate the Dynamic Database):
hostname(config)# dynamic-filter use-database
4. Optional - Classify the traffic that will be exempted and subjected.
Identify the traffic that you want to monitor or drop. If you do not create an access list for monitoring, by default you monitor all traffic. You can optionally use an access list to identify a subset of monitored traffic that you want to drop.
Example:
ASA(config)#access-list botnet-exclude extended deny ip any 192.168.0.0 255.255.0.0 ---> exempted traffic
ASA(config)#access-list botnet-exclude extended permit ip any any ---> subjected traffic
5. Enable the Botnet Traffic Filter (recommended on outside interface).
We recommend enabling the Botnet Traffic Filter on all traffic on the Internet-facing interface, and enabling dropping of traffic with a severity of moderate and higher.
dynamic-filter enable [interface interface_name] [classify-list access_list]
Without any options, this command monitors all traffic. We recommend enabling the Botnet Traffic Filter on all traffic on the Internet-facing interface using the interface keyword.
You can optionally limit monitoring to specific traffic by using the classify-list keyword with an access list.
Example: ASA(config)#dynamic-filter enable interface outside classify-list botnet-exclude
You can enter this command one time for each interface and one time for the global policy (where you do not specify the interface keyword). Each interface and global command can have an optional classify-list keyword. Any interface-specific commands take precedence over the global command.
6. (Optional) To drop malware traffic automatically:
dynamic-filter drop blacklist [interface inteface_name] [action-classify-list subset_access_list] [threat-level {eq level | range min max}]
Example: hostname(config)# dynamic-filter drop blacklist interface outside action-classify-list botnet-exclude_subset threat-level range moderate very-high
The action-classify-list keyword limits the traffic dropped to a subset of monitored traffic. The dropped traffic must always be equal to or a subset of the monitored traffic. For example, if you specify an access list for the dynamic-filter enable command, and you specify the action-classify-list for this command, then it must be a subset of the dynamic-filter enable access list.
7. Optional - Configure the Static Database:
hostname(config)# dynamic-filter {blacklist | whitelist}
Add names and/or IP addresses to static blacklint and/or whitelist. Example:
hostname(config)# dynamic-filter blacklist
hostname(config-llist)# name bad.example.com
hostname(config-llist)# address 10.1.1.1 255.255.255.255
hostname(config)# dynamic-filter whitelist
…
You can enter these commands multiple times for multiple entries.
8. Optional - Enable DNS Snooping (on the external inferface, recommended):
Without DNS snooping for the dynamic database, the Botnet Traffic Filter uses only the static database entries, plus any IP addresses in the dynamic database; domain names in the dynamic database are not used.
This procedure enables inspection of DNS packets and enables Botnet Traffic Filter snooping, which compares the domain name with those on the dynamic database or static database, and adds the name and IP address to the Botnet Traffic Filter DNS reverse lookup cache. This cache is then used by the Botnet Traffic Filter when connections are made to the suspicious address.
Configure a class map and only match dns traffic:
class-map class-map-name
Example: hostname(config)# class-map botnet-DNS
Match only dns traffic:
hostname(config-cmap)# match port udp eq domain
Add or edit a policy map so you can set the actions to take with the class map traffic:
policy-map policy-map-name
Example: hostname(config)# policy-map botnet-policy
Identify the class map you created previously:
class class-map-name
Example: hostname(config-pmap)# class botnet-DNS
Enable DNS inspection with Botnet Traffic Filter snooping.
inspect dns [map_name] dynamic-filter-snoop
Example: hostname(config-pmap-c)#inspect dns dynamic-filter-snoop
To use the default DNS inspection policy map for the map_name, specify preset_dns_map for the map name.
Example: hostname(config-pmap-c)# inspect dns preset_dns_map dynamic-filter-snoop
Activate the policy map on an interface:
service-policy policy-map-name interface interface_name
We suggest that you enable DNS snooping only on interfaces where external DNS requests are going, to avoid unnecessary load on the ASA. For example, if the DNS server is on the outside interface, you should enable DNS inspection with snooping for all UDP DNS traffic on the outside interface.
Example: ASA(config)# service-policy botnet-policy interface outside
Links:
http://docwiki.cisco.com/wiki/ASA_-_Botnet_Configuration#Configuration
GNS3 Lab - Botnet Filtering using CLI and ASDM

Basic CLI Configuration to access ASA device by using ASDM
192.168.1.2 = IP address of my PC
http server enable
http 192.168.1.2 255.255.255.255 outside
! To enable the HTTPS server and let a host on the outside interface with an address of 192.168.1.2 access ASDM, ! enter the !following commands:
crypto key generate rsa modulus 1024
enable password juantron
username juantron password juantron privilege 15
! Verify ASDM image is installed on the ASA device (show flash), if not:
!Verificar en la memoria flash si el ASDM está instalado. A partir de la versión 7 ya viene por defecto, de lo !contrario seguir los !siguientes pasos. Si ya estuviera instalado, no sería necesario hacer el volcado de image de !ASDM.
copy tftp flash:
Address or name of remote host []? 192.168.1.2
Source filename []? asdm-647.bin
Destination filename [asdm-647.bin]?
Accessing tftp://192.168.1.2/asdm-647.bin...!!!!!!!!!!!!!!!!!!!!!!!!!!!!!!!!!!!!!!!!!!!!!!!!!!!!!!!!
Specify the location of the ASDM image, enter the following command:
asdm image flash:asdm-647.bin
Getting to the ASDM GUI


ASA CLI Configuration for Botnet Traffic Filtering:
interface GigabitEthernet0
nameif inside
security-level 100
ip address 192.168.32.1 255.255.255.0
!
interface GigabitEthernet1
nameif outside
security-level 0
ip address 192.168.1.10 255.255.255.0
!
interface GigabitEthernet2
nameif dmz
security-level 50
ip address 192.168.2.1 255.255.255.0
!
dns domain-lookup outside
dns server-group DefaultDNS
name-server 8.8.8.8
domain-name ccnpsecurity.com
!
access-list OUTSIDE extended permit icmp any any
access-list OUTSIDE extended permit udp any any eq domain
access-list OUTSIDE extended permit udp any eq domain any
access-list OUTSIDE extended permit tcp any any eq https
access-list INSIDE extended permit icmp any any
access-list INSIDE extended permit udp any any eq domain
access-list INSIDE extended permit udp any eq domain any
access-list DMZ extended permit icmp any any
access-list DMZ extended permit udp any any eq domain
access-list DMZ extended permit udp any eq domain any
!
access-group INSIDE in interface inside
access-group OUTSIDE in interface outside
access-group DMZ in interface dmz
!
route outside 0.0.0.0 0.0.0.0 192.168.1.1 1
!
dynamic-filter updater-client enable
dynamic-filter use-database
dynamic-filter enable interface outside
dynamic-filter drop blacklist interface outside
dynamic-filter blacklist
name www.google.com
!
class-map botnet-DNS
match port udp eq domain
!
policy-map botnet-policy
class botnet-DNS
inspect dns dynamic-filter-snoop
!
service-policy botnet-policy interface outside
!
CASA(config)# dynamic-filter database fetch
INFO: Dynamic Filter: update succeeded, no new version
CASA(config)# exit
CASA# show dynamic-filter updater-client
Dynamic Filter updater client is enabled
Updater server URL is https://update-manifests.ironport.com
Application name: threatcast, version: 1.0
Encrypted UDI: 0bb93985f42d941e50dc8f022350d1a87a00326a6f0b7425158fd0436f765a3ca93801b263e8619add0af1b918653bc9
Last update attempted at 08:24:24 UTC Apr 21 2015,
with result: No new update
Never downloaded new update. Most likely waiting to download intial database or due to
connection error to updater-server or wrong updater-server URL.
Next update is in 00:27:23
No database file
NOTE The dynamic database download fails in GNS3, but:

Testing Botnet Traffic
Because the dynamic database could not have been downloaded, we will test the static database from PC1:

That's all folks, for me a big step, hope you find this useful too.
NOTE: Your e-mail will not be shown in the output. You can use an invalid e-mail, if you want.
Thank you for your co-operation in helping me to improve.